Hello dear biters and related species from unexplored planet full of life and natural resources. Recently I have been working on several high resolution graphics for your best friends - the tank and the player character. In this article I would like to show their updated visuals to you, as well as a sneak peek at how they are produced. The following text may contain traces of automation.
Like most biter stories end, this story started with the tank. I just took the 3D scene that Pavel made in 2014. There was quite a bit of work required to make it all render correctly, but eventually I arrived at the desired result.
However there was one thing that really bothered me in the process - making the colour mask look good was rather impossible.

In general this is an issue that we already encountered earlier with the locomotive, cargo wagon and train stop. The cause was the RGBA values set for player colours, so I went ahead and changed all of them, I even added a “default” colour, so you can easily revert back to the single player default colour in 0.16 (which is also "Orange").
The dynamic colour algorithm (we call it tint) works in very weird ways, where if Alpha is set to 1.0, it kind of multiplies the mask by some selected colour. Alpha 0.0 somehow makes the whole mask sprite draw additively while colorized by the selected colour.

Regardless of the technical magic, the final verdict is that unless you are doing something extremely specific, the colour mask values should always be at 0.5 Alpha. You might have already noticed that the train colour sliders only allow you to change RGB values and not Alpha. That makes the colour much more stable - any RGB value you pick is going to work, once you start touching the Alpha it can look wrong and broken.
I would like to take this opportunity to ask modders to keep this in mind, as I have noticed multiple mods using 1.0 Alpha values in colour mask tint. The Alpha is black magic, keep it at 0.5 please.
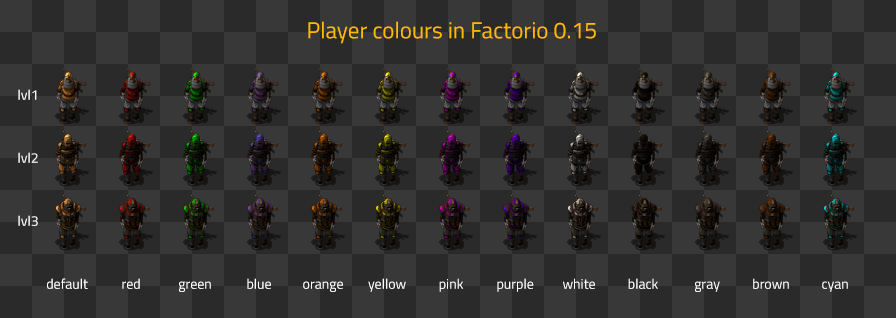
The tank and the car colours are both much nicer now, but the player character colours seem a bit off...
![]()
The whole mask-works-with-0.5-alpha has one big condition - both the mask and the masked area of the sprite under it have to be desaturated. And the player graphics are already made to be orange. This is especially visible in the image above on colours like gray. This was never an issue since the player colours were using 1.0 Alpha, apart from the problem that all of the non-default colours looked horrible.
It might have been possible to do some quick hacks and just desaturate the player sprites where needed, but we found it more appropriate to take the opportunity to bring the player character into high resolution and fix it along the way.
We were already aware that the player character is a very special task. Just the amount of spritesheets and Blend scenes already screams madness. Basically, the player character was split across many Blend files that Albert produced in 2015, each of them having one animation sequence. I honestly didn’t even ask how much work and time did it take for him to create all of this.

The game currently uses:
Each of these animations then have a variation for two armor levels, which can be drawn on top of the basic character. In total we are talking about over 4,000 individual sprites, double that number when we also consider high resolution.
From past experience we already know that re-rendering an entity in high resolution is almost never “just make it have more pixels”. Shaders and details start working differently, and it’s always necessary to do some changes. However, editing 21 Blend files at the same time does not sound very appealing or efficient, so our plan was to merge all of the animation into one huge Blend file. The aim is to have:
Per usual this is much easier said than done, it is possible with the tools that Blender has, but would require an extreme amount of manual work. It would also take way too much time, and would be way too fragile.
Making the player character in high resolution would have been utterly insane without the use of scripting. In the following part of the article I will show you a few of the most useful Blender scripts that I wrote and used in the process.
1. Copy objects between Blender scenesThe first task sounds simple - copy-paste the objects from the source Blend file to the new one - until you try to do it. In Blender you can Copy + Paste objects between scenes easily, the catch is that in the destination, they are all pasted to the same layer, depending on which layer is active. However the objects forget which layer they are from in the source scene. This is a big problem, but after short thinking I wrote a new object transferring tool.
![]()
It is a set of two scripts, the first one prepares objects in the source scene (it changes their names to have a prefix with layer numbers). The second script processes them in destination by reading the name, moving the object to the appropriate layer(s), and cleaning up the name as if nothing ever happened.
2. Link mesh data of identical objectsThe copy pasting is great, but every new paste creates a set of new unique objects with unique materials. If you do this 21 times, the amount of duplicate data which is supposed to be the same goes up like a rocket. Generally 3D software has a way to create duplicates which are linked so if you edit one, you also edit the other. However once you break the link, it’s not so easy to bring it back, because the program isn’t sure if the two objects are really the same. In Blender this is possible, but doing it one by one would be way too much work so it’s time for another script.
This one reads every object’s vertices one by one, and saves them to giant lists. It then compares it to another object, and if the other object is identical, it makes a link between them - if not, it keeps both of them unique and adds the new one to the list of vertex data to be compared with.
It’s actually surprisingly fast, considering that it filters through about 5 million vertices, but it still takes several minutes to process.
The result seems good except for one problem - some of the objects have identical mesh data, but special materials that we used for rendering shadows, which is solved by running another script, which searches for objects with the shadow maker material and removes them. This has to be done before linking the mesh data to make sure that our mesh data ends up with the correct materials.
3. Clean material slotsThe next step is to unify materials. This is already mostly taken care of because the mesh data already carries the used materials in it, but going through all of them and manually checking was required. It wasn’t helping that every object had defined about 20 material slots, even if it was using just a handful of them.
Whenever you have a mesh with multiple materials being used on different polygons, and you remove some polygons, chances are that you aren’t using all of the materials any more.
So I made myself a script which removes the unused material slots so I wouldn’t have to manually check so many of them. It’s not only more work but it’s also much easier to spot errors when you see only what you need to.
4. Generate Render Layers and Compositor NodesWith all of the objects correctly linked and materials properly editable, it’s time to figure out how to output this whole thing into sprites. As we already hinted in FFF-146, we are almost always using Render Layers going into Compositor nodes to output many different passes of the same scene.
Since we are keeping the layer structure of the original source, it was possible to set up the rendering system to do the same again. It was still a lot of work because it was not always consistent and many of the scenes required small but hard to spot tweaks.
One thing which helps at least a little bit, is pre-generating all of the render layers with their names and some basic setup, which is consistent between all scenes.
Render Layers aren’t much without a way to save them to the final images - this is handled by the compositor nodes. There is a special case for Ambient Occlusion and Shadow passes, but in general it’s absolutely consistent so scripting this part is great as it removes all need for manual attention to this. The script just reads the Render Layers and generates the nodes to fit them.
5. Rendering and final processingTo render all this from the 3D scene, we are using a fancy system which allows us to render across multiple computers, as the animations would take over 40 hours to render on a single PC.

The rest is basically the same as with the combinators shown in FFF-194, so I won't go into details here.
After all this, we get the player graphics in high resolution, with colour masks working correctly and also a lot of new Blender tools for ourselves to work with.

And here is a preview of how the colour masks work for 0.16.
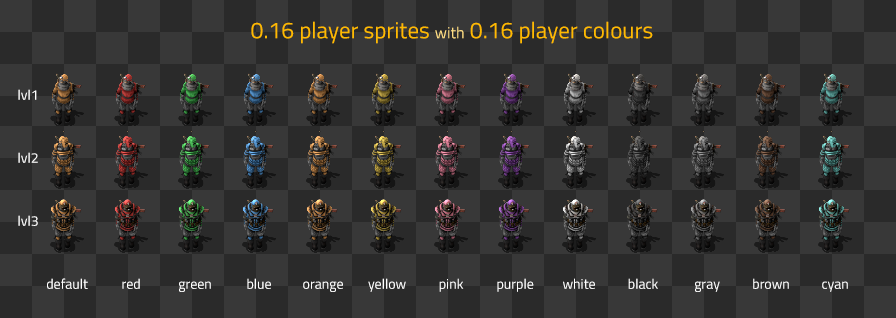
All the things in this article combined took a lot of time to make, especially the high resolution version of the player character. In the long term we are likely going to do some more changes and adjustments to the player character models and animations. Thanks to the new source files we will be able to do that, and for now we are satisfied with how the player looks for 0.16.
Razer contacted us quite a while back and asked us if we could add Razer Chroma support to Factorio. Razer Chroma/Chroma Link means that the game can take control of any supported RGB devices (from mouse and keyboard to LED strips and chairs) and control the colors of the lights.
We implemented the following:
People already want to control their light using the circuit network and lua, so something like that could be cool to add in the future if there is demand for it.
Normally we wouldn't add features to 0.15 after it was marked stable, but since there will be some Razer events, we thought it's good idea to have Factorio in the list of supported games. So the feature was added today to 0.15 as an experimental update but it will be marked as stable next week if nothing is broken.
If you have anything to say you can let us know on our forum.